CentOS 7 Remote Logging Using Synology Log Center

Managing large numbers or servers can be quite cumbersome, especially when your logs are not centralized. In the past I have managed clusters of servers. One such cluster was acting as a mail filter for a large number of customer mailboxes. Without centralized logging acting on a customer support ticket would involve logging into every server to read the logs.

We can avoid this cumbersome process by using centralized logging, in this case our log server will be a Synology DiskStation running DSM 5.1. Once configured, the logs from our servers will be sent to the Synology DiskStation making it really easy to search for log events across multiple servers from one interface.

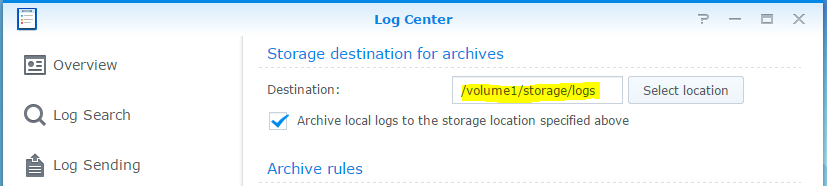
First thing first we need to tell the Synology DiskStation where it should be saving our log files. We can do this by opening Log Center and clicking on Storage Settings. You will see an option called Destination use this to configure a folder location to save the log files. In our case the log files are being saved to /volume1/storage/logs. There are some other options available to do with archiving but we will not be going into these and just use the defaults, you are welcome to experiment with your own settings. Once you are happy with the setting click on the Apply button.

synology log center storage settings

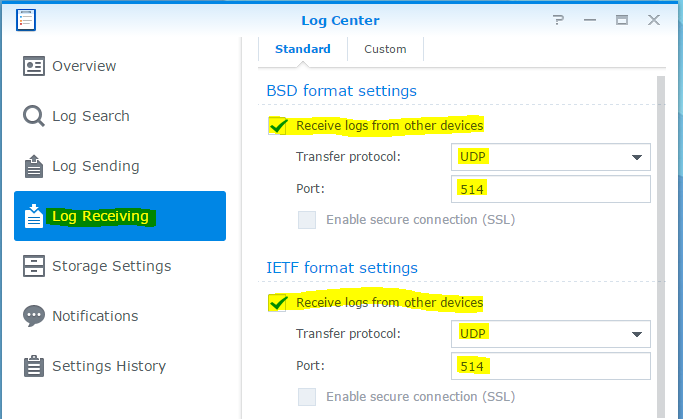
The next step is to actually enable Log Receiving within the Log Center, it’s pretty easy. Click on Log Receiving on the left hand side. In our case we have enabled the Log Center to receive logs in BSD and IETF formats. Again click on the Apply button, in the next step we will start chucking some logs at the Log Center.

synology log center log receiving

Now we need to start sending some logs to the Log Center. We are going to do this with a CentOS 7 virtual machine by making some changes to rsyslog. The great thing about rsyslog is that we can continue to have local log files and also send them to a syslog server at the same time.

You will need to use your favorite editor to edit the log file. My favorite is nano it’s considerably easier to get used to than vi.

nano /etc/rsyslog.conf

At the bottom of the rsyslog.conf file add the following, replace <IPADDRESS> with the IP Address of your DiskStation.

*.* @<IPADDRESS>:514

In our case the IP Address of the DiskStation is 10.0.0.1, so our line in rsyslog.conf will look like the following.

*.* @10.0.0.1:514

Make sure to save your changes and quit out of the editor, in nano we can do this by pressing Ctrl+x nano will then prompt us to save the file. Just save the file with the same file name.

Finally you should restart rsyslog, to do this on CentOS 7 you should use the following command.

systemctl restart rsyslog

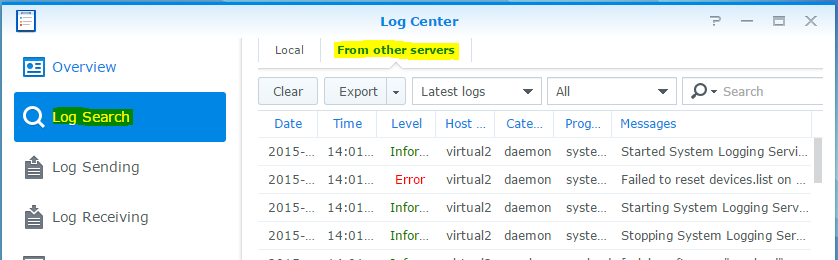
You can now search for logs in the Log Center by going to Log Search and then click on From other servers it should look something like the following.

synology log center logs from other servers

Mounting CDROM ISO To a Running KVM Guest

When you created your virtual machine with KVM maybe you specified a CDROM image file but need to attach a different image during install to load drivers? This is almost guaranteed if you are setting up a Windows virtual machine with virtio devices. You must first ensure that your ISO image is within /var/lib/libvirt/images (it may vary on your distro) however this path is correct for my install of CentOS 7.

To attach a CDROM ISO image use the following, in my case I am attaching the virtio drivers iso. The command is formatted as follows attach-disk <virtual machine name> <image file> <device> <type> <mode>

virsh attach-disk vm102 /var/lib/libvirt/images/virtio-win.iso hda –type cdrom –mode readonly

If you are in the same position as me and need the virtio drivers you will find after attaching the Virtio iso image you can not continue the Windows install. Once the drivers are installed you must attach the Windows ISO image again.

virsh attach-disk vm102 /var/lib/libvirt/images/en_windows_7_professional_with_sp1_x64_dvd_u_676939.iso hda –type cdrom –mode readonly

Using SSH to Bypass Content Filter on College Networks

It’s no secret that college’s, universities and employers use web content filters (also known as proxies) to limit the range of websites you may access. Maybe it’s to mitigate industrial espionage or protect you from seeing unsuitable content. Either way it can be fairly annoying especially if some genuine websites become blocked.

Before we go into the details on how to bypass these controls, you should be fully aware that you are most probably breaking some rules. It could be a clause in your contract of employment or in some sort of computer and network usage policy. We are not responsible if you ignore these warnings, if you decide to punch a hole through in place protection mechanisms it’s your own problem if you get caught, fired, sacked whatever else. Do not come crying here, you have been warned.

First things first we are going to need a server of some sort running Linux. You can get yourself a really cheap VPS from Digital Ocean (my referral link is included) they also have a range of locations to choose from. To get your VPS (also known as a Droplet in Digital Ocean speak) you should follow this guide https://www.digitalocean.com/community/tutorials/how-to-create-your-first-digitalocean-droplet-virtual-server in our example we will be using Debian 8.1 x64 but in reality the choice of Linux distribution will not make much difference as long as you can locate the SSH config file.

Now you have your VPS up and running, login using your favorite SSH client, you will need to login as root or use sudo to gain root privileges if logging in as a non privileged user. You need to edit the sshd_config file to allow SSH to listen on multiple ports. We want to listen on port 22 and port 443.

nano /etc/ssh/sshd_config

Find the row which denotes the port which SSH is configured to listen on, it will look like this.

Port 22

Add an additional row underneath this to allow sshd to listen on port 443

Port 443

Now save the changes and quit out of nano, you can use Ctrl + x to quit and be prompted to save or Ctrl+o to save and then Ctrl+x to quit.

For the next step make sure to restart the SSH service, on Debian you can do this by running the following command.

/etc/init.d/sshd restart

Your SSH server should now be listening on both port 22 and 443, you can test it by opening a new SSH connection to the server IP but change the port number 22 for 443, it would look like this if you were using Putty.

Putty Connection

Now you should be able to login again using the same user account you used last time.

If you have got this far you are ready to bypass the proxy content filter. Open Putty make sure its a new Window and not an existing session as the Proxy configuration options do not work if it’s a Window of a current session. Next configure the proxy settings in Putty to be the same as the ones your network is using, you can sometimes find these in the proxy settings of your web browser.

In our case we are using the proxy IP of 192.168.100.100 and the port 8080.


Putty Proxy Settings


To actually tunnel the traffic we need to make Putty act as a dynamic proxy (socks proxy) so within the same Putty window as before, click on SSH and then Tunnels. You should enter the source port as 8000 and select the Dynamic radio button then click add.

Putty Dynamic Proxy

We are very very nearly there now, still within Putty on the left hand side scroll back up to Session, you should now enter the IP address of your VPS and the port 443 and ensure the connection type is set as SSH just as we done when we tested port 443 was accepting SSH connections. Once you are happy the configuration is correct click the Open button and then login one more time.

Putty Connection


If you have managed to login at this point, then congratulations you just punched a hole through the proxy content filter, you should be logged into the shell of your VPS.

Putty Established Session

One last step is to reconfigure your web browser to point at the Putty dynamic proxy we configured listening on port 8000. Remember the proxy type is SOCKS not HTTP. In Internet Explorer it might look like this.

Internet Explorer Proxy Settings

You could now browse to a website like http://www.whatismyip.com if the IP address is reported as the IP address of your VPS then you now have unrestricted access to the web.

Enjoy and remember to be responsible, mechanisms like proxy content filters are put in place for a good reason. If not to protect you from seeing unsuitable content to at least protect the network to some degree from spyware, viruses etc.